
The Skaven list consisted of:
Vermin Lord
Plague Priest
lvl2, great poxed rat
Plague Priest
lvl2, plague furnace
Chieftain
BSB, shield, halberd
4x5 Giant Rats w. Packmaster
20 Slaves
21 Clanrats
24 Clanrats
25 Plague Monks
6 Gutter Runners
Hell Pit Abomination
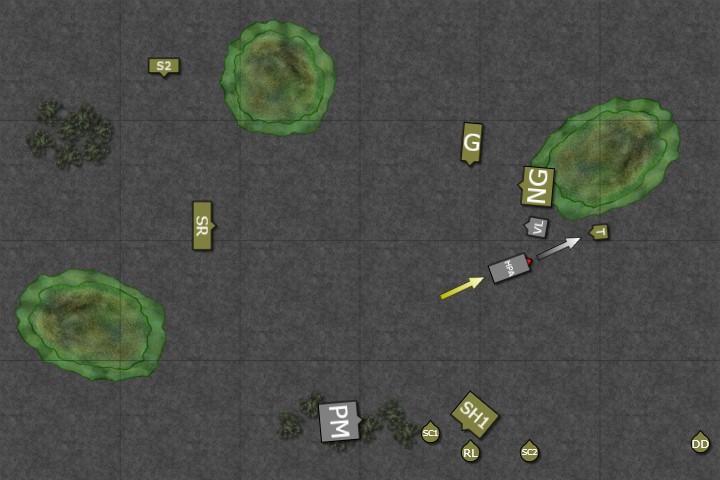
Deployment:
The Orc Boyz are deployed to contest each of the objectives, with my fast and hard hitting units placed in the middle. The Skaven stacks their left flank with most of the units behind a hill to hide from my artillery. The Black Orc BSB and his unit, along with the Savage Orc Boar Boyz are up against the Plague Monks and the Plague Furnace, while my Warboss and most of the remaining army are ranked up against the large Skaven blocks and the Abomination.

Turn 1 - Orcs & Goblins
The SOBB move into position to charge the Plague Monks in the next phase, while hoping to stay far enough away from the Vermin Lord and its 16" charge range. The BSB and his unit move up behind them. On the other side, the Squig Herd squabbles while my Warboss move forward, flanked by the two chariots as the Giant runs up behind the hill. The Skaven make use of the Stormbanner, which prevents some of my artillery from shooting at all and the rest of them to miss their targets.

Turn 1 - Skaven
The Vermin Lord declares a charge against the SOBB, but luckily my estimations prove correct and it falls about an inch short of making it, leaving it stranded in the middle for my Squig Hoppers (SH2) to charge the next turn. His general, the Plague Priest on the Rat, leaves the flank unit of Clan Rats (CR1) to join the one in the middle (CR2). His Giant Rats on the hill (GR4) moves close enough to release my fanatics, which I hurl through them in lack of better targets to hit. His magic fails to penetrate my defense.

Turn 2 - Orcs & Goblins
On the right side, the Wolf Riders declare a charge against the Giant Rants (GR3) while the Giant charges into the Clan Rats behind them, and both enemies decide to hold against the charges. In the middle, both chariots combine with the Troll to charge the Slaves, who decides to flee. Finally, on the left side the Savage Orcs are forced to charge the Giant Rats (GR1) due to their frenzy, who also hold. The Slaves manage to escape the Wolf Chariot's 18" charge with little less than an inch to spare, meaning the combo charge in the middle fails. All others are succesful, with the Giant hitting the front of the Clan Rats and the SOBB angling up so that by destroying the Giant Rats they will still overrun into the Plague Monks behind them. The Squig Hoppers tries to jump into the Vermin Lord in the middle, but rolls miserably on their random movement and fails to make it.
The Stormbanner is still in play, making my artillery miserable and hitting nothing. My magic continues to be incapable of getting through the combined defense of their three wizards.
In combat, the Wolf Riders kills a few Giant Rats and breaks them, overrunning to join the Giant against the Clan Rats. It proved unnecessary, as the Giant decided to merely Yell and Brawl, which automatically resulted in the Clan Rats losing combat by -2 and breaking as well, causing panic in the nearby Giant Rats (GR4) and both Skaven units are chased down by the wolves, who unfortunately chases directly through both Fanatics and are destroyed in a spectacle of blood , fur and giant metal balls on chains.
On the left side, the Savage Orcs completely annihilates the Giant Rats in their way and overruns into the Plague Monks. Having been forced to reveal my Skull Wand in the earlier battle, my opponent wants to play with 'clipping'*, that is due to the angle of the overrun I won't be able to maximize the amount of combatants in the next battle, which effectively means my Savage Orc Shaman is out of combat so that I won't be able to use my Skull Wand to kill his Plague Furnace. Since it's a friendly game I didn't argue the point, even though it effectively meant they would lose. Charging an Unbreakable unit with the SOBB, without a decent way of getting rid of what makes them unbreakable (the Plague Furnace) is not a good situation.

Turn 2 - Skaven
On the right flank, the Plague Censor Bearers (being skirmishers, which I had forgotten) charges into the Giant and with Hatred and Frenzy hits with all 15 attacks, but inflicts only 5 wounds on the big guy, who with only one remaining wounds starts jumping up and down and inflicts 7 wounds in return, which kills all of the Censor Bearers!
In the middle, the Clan Rats joined by the Plague Priest and their BSB charges into the Snotlings and overruns into the Orc Boyz with the Warboss. With clipping*, it prevents his unit from maximising on the overrun which prevents my Squig Herd from getting a flank charge in the next turn. The Hellpit Abomination decides to first charge my Boar Chariot, which flees, then overrun into my Wolf Chariot, which also flees, leaving the horrible construct stranded in the middle of the board while my BSB and his boyz are looking at a fast moving chariot heading straight their way unless I rally in the next turn.
As suspected, without the Skull Wand in play, my Savage Orcs fail to win the combat against the Plague Monks and the Furnace, but from being just within range of my BSB, they pass their break test on the re-roll and remains for another round of combat.
The Giant Rats (GR4) running across the middle manages to rally, but the Slaves do not and flee off the board. With magic defense still working, the Skaven wizards prove unable to inflict much damage with their spells. At least for now.

Turn 3 - Orcs & Goblins
On the right side, the Squig Herd counter-charges into Clan Rats who charged the Warboss' unit. The Troll charges into the just reformed Giant Rats, who hold, while the Giant moves up behind them. The Troll kills a rat, but is outnumbered and the combat is tied.
Both chariots find themselves within barking distance of the Warboss and so they manage to rally before they barge into the BSB and the boyz. The Warboss then calls out a challenge and ends up in combat with the Plague Priest, who unfortunately ends up wounding him before he cuts it down while his boar stomps on it for good measure. Despite losing by a lot, thanks to the BSB the Clan Rats hold on for another round of combat.
In the middle, the Squig Hoppers abandons their plan to hunt down the Vermin Lord and instead hops into the Abomination behind them, realizing of course that they hold little chance of defeating it but hoping to at least keep it occupied or redirected for another turn. They inflict a wound, but receives two in return but since they are within the Warboss' range, they last for another round.
To the left of the field, the Spider Riders declare a charge against the Giant Rats (GR2) who flee out of range. The Savage Orc Shaman moves into position to strike against the Plague Furnace, but with his dangerous wand in hand, all the rats focus their attacks on him and he is killed before he gets to strike (in hindsight, I probably should have challenged seeing as how their champion had been killed, would have spared me of a few attacks). As such, the Savage Orcs break but not before killing off the Plague Priest ontop of the Furnace, and are then chased down by the Plague Monks, who overrun just barely into the BSB and the boyz. To add insult to injury, it turns out I had turned the unit too much to the right in order to see the Abomination that a majority of the Plague Monks were in my flank, so with those odds against me, the BSB calls for the unit to flee back into the forest.
Despite the retreat, the round still sees the first two of the magic users slain, awarding me two Victory Points for each.

Turn 3 - Skaven
The Skaven finally gets their Gutter Runners onto the field and they arrive to the south, right between my war machines. As the Stormbanner runs out at last, they hurl their throwing stars at the crew of a spear chukka but miss their mark. The Clan Rats then breaks from combat against the Warboss, his Orcs and the Squig Herd, and they are chased down and destroyed.
Hoping to overkill the pesky Squig Hoppers in battle with the Abomination, the Vermin Lord charges for their rear but again falls short of the target. It matters little, since the Abomination kills of enough Squigs to send them running and the big monster overruns into the Wolf Chariot with the Shaman on top. Running away would bring it directly into the Plague Monks behind it, so the shaman and the crew bravely hold for the charge, hoping to at least tie up the monster for another turn.
Misfortune continues for the Green lads when the frenzied Plague Monks find themselves just within range of being forced to charge the already fleeing orcs and the BSB, which sends them off the board.

Turn 4 - Orcs & Goblins
On the right, top of the map, the Troll fails a stupidity check since it's too far away from the Warboss and entangles itself with the Giant, leaving them both prone for a round. The Orc Boyz and the Warboss move to claim the eastern objective while the Squig Herd turns around to face the Gutter Runners.
In the middle, the Orc Boar Chariot thinks the better of charging into the Abomination and instead turns on the spot and drives up in front of the frenzied Plague Monks just short of the forest, aiming to bait them into the trees and hopefully out of the battle for good. The Wolf Chariot and the Shaman are destroyed by the filthy monster.
Far up in the left upper corner, an epic battle breaks out between the charging Snotlings and the Giant Rats, which is won by the green ones who chase down the rats and stomp on their corpses with their tiny feet.
At the end of the turn, it is then time to decide who controls the objectives. Even though the Spider Riders have moved up to contest it, the Plague Monks are just within range and therefore the Skaven claims the western point. To the right, the Orcs have the eastern objective well in hand, meaning 2 VP's to each army.

Turn 4 - Skaven
To the right, the Vermin Lord finally gets the charge distance right and runs straight into the Orc Boyz on the objective while the Abomination almost makes it there in time. The large rat bellows out a challenge, which is accepted by the unit champion (who gets slaughtered mercilessly) but the Vermin Lord still loses the combat against the overwhelming number of boyz, but passes its break test. The Gutter Runners continue to hurl throwing stars at the Spear Chukka and takes out two of its crew.
To the left, the frenzied Plague Monks snarl and, to the dismay of its general, charges the Boar Chariot, kills it and is forced to overrun far into the forest, where it gets stuck for the rest of the battle. This means that both objectives are controlled by the Greenskins, awarding them another 4 VP's!

Turn 5 - Orcs & Goblins
To the right, the Troll passes a stupidity check on its own, meaning him and the Giant are free to move again. The Warboss accepts the next challenge of the Vermin Lord and finds himself far too unprotected against its 5 WS8 S6 attacks, which kills the orc and with a magical glaive causes an impressive 7 points of combat resolution. The death of the Warboss proves too much for the boyz, who all run away but gets chased down by the Vermin Lord, still carrying the head of its slaughtered victim.
South of the mayhem, the Squig Herd charges the Gutter Runners, who have little choice but to hold and such falls to the hungry jaws of the Squigs who eats them all in one go. Meanwhile, the artillery finally finds it mark and takes two wounds of the Abomination. Unfortunately, the damage is regenerated.

Turn 5 - Skaven
With few tempting targets remaining and within range, the Abomination charges the lonely troll which flees out of range. Meanwhile, the Vermin Lord realizes that the Night Goblins will be large enough to claim the objective in the next round if they can only get there, and so runs up next to it, roaring and displaying its many victims in an attempt to terrorize the easily-frightened goblins.
No longer facing any magical defense, the Vermin Lord casts a few hurtful spells to further drive the point home to the goblins, but it is too little too late and not even Skaven magic seems to be able to turn this around.
Turn 6 - Orcs & Goblins
The efforts of the Vermin Lord proves enough to make the Night Goblins fail their panic test and run for cover, meaning the Lord and the Abomination actually have control of the eastern objective. Throwing caution to the wind, the Giant seeks to rectify the situation by charging the Abominaton even though the big guy is suffering from blood loss, with only a single wound left from the battle against the Censor Bearers. But Gork rewards bravery, as the saying goes, and the Giant rolls a "1" on the chart, meaning Yell and Brawl and the Abomination does not get to strike back. A break test on Stubborn leadership 8 is failed, and the monster runs away straight into the returning Squig Herd which destroys it, with no chance of coming back. Waaaaagh!
To add insult to injury, the chukkas hits the Vermin Lord with their spears, inflicting 3 wounds on the big rat thing.
With such fortune returning to them, the Greenskins again finds themselves in position of both the objectives, seeing as how the Giant's US6 beats out the Vermin Lord's US5. Another 4 VP's are handed to the green dudes!

Turn 6 - Skaven
With the final turn upon us and things looking grim for the Skaven, the Vermin Lord decides to charge the Giant to bring him away from the objective. Realizing, of course, that 5 attacks hitting and wounding on +3 are likely to inflict the final wound that would topple the giant before he gets to strike back, the big guy decides to run away instead. Of course, the 16" charge range of the Vermin Lord proves to swift for even the most stubborn of giants and the big rat avatar cuts him down. Ironically, the charge brings the Vermin Lord too far away from the objective, leaving no one within reach of claiming it. Perhaps it would have been wiser to stay in range and hope to take out the giant with magic instead, but it would probably not have mattered that much in the end.
For the final round, the greenskins claim the western objective while both are awarded a point for the neutral eastern objective.

Result: WIN 17-3 in favour of the Orcs & Goblins, even though the Skaven probably had more points on the board at the end. I believe the keys were that I used my non-scoring units to take out his scoring units, such as the Giant on his Clan Rats and the Chariots on his Slaves (SOBB on his Plague Monks was also the plan) while I didn't allow his nasty units, such as the Abomination to do much killing, only taking out some Squig Hoppers and a chariot, by the time where they were fairly expendable. I realized that if I can't take out the monsters with shooting, I wouldn't be able to kill them at all, so I might as well avoid them for as long as I could. It also helped that even though he brought three wizards, he wasn't able to effect the game at all until the final two turns. Of course, with only two shamans on my own, I wasn't able to either.
My most valuable unit was probably the giant, who most likely got me more VPs than anything else. One could argue that the Spider Riders outdid him in that, but honestly they were just sitting on the objective for three straight turns. Even a snotling unit can do that!
* I re-read the paragraph in the rulebook after the game and noticed that, while you do measure a straight line from where you overrun to see if you hit a new enemy, once you've established that you can (and indeed must) wheel in order to bring as many models as possible into combat, just like always. So the entire SOBB unit should have gotten into combat on the first turn, and the Squig Herd should have gotten the flank on the Clan Rats.


No comments:
Post a Comment